All about Die Traces (or Die Lines) and Packaging
and why they are important
Print projects aren’t always about straight edges and flat pages. Many printed items require shapes to be cut out of a sheet, either as a design feature or for the functionality of the final product. Items such as envelopes, folders, cartons, and product boxes all rely on die cutting to achieve their final, usable form.
Even design-driven elements — like a uniquely shaped business card or a curved edge — often require die cutting. While these may not be functionally necessary, they play a big role in visual impact. To cut any of these shapes accurately, your printer will need a die trace file.

So, What Exactly Is a Die Trace?
A die trace (also known as a die line) is the outline that tells the printer exactly where to cut the shape out of the printed sheet. These lines are usually created in a spot colour so they stand apart from the standard CMYK artwork. This allows the printer to extract the die trace separately when manufacturing the physical die.
In addition to cut lines, a die trace can also include:
- Scoring and Creasing lines
- Perforations
- Fold lines
All of these elements work together to ensure the printed piece folds, assembles, and functions as intended.

How Do I Create a Die Trace or Die Line?
Start by clearly defining the product you are creating — its size, shape, and purpose. If you already have a carton, folder, or envelope that you like, carefully pull it apart. This gives you an excellent physical reference to build your design from.
For items like folders or envelopes, your printer may already have standard die trace templates available. Ask them before reinventing the wheel — it can save time and money.
A very important step is to print the die line, cut it out, and fold it into shape. This allows you to test whether the design actually works before committing to production.
Once your files are ready and supplied to the printer, always request a hardcopy proof or mock-up. While this may add a small upfront cost, it can save you thousands by preventing costly production errors.

How Is a Conventional Die Made?
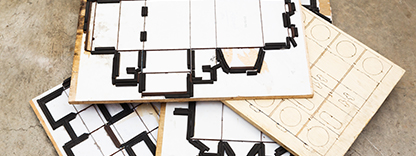
Once approved, your digital die trace file is sent to a laser cutter or CNC machine, which accurately cuts the shape into a thick plywood or board base.
Sharp steel blades are then bent and fitted into the laser-cut grooves to form the cutting edges. Finally, rubber is added around the blades to provide resistance, improve cut quality, and ensure operator safety.

Common Die Cutting Methods
Traditional Die Cutting
Mechanical die-cutting machines (such as a Heidelberg Cylinder or Bobst) are commonly used for larger runs. The wooden die block is mounted into the machine, and pressure is applied as sheets pass through, cutting each sheet into the required shape.
Digital Die Cutting
For shorter runs or digitally printed work, digital die cutters (such as an iEcho) are often used. In this case, the file is sent directly to the cutter, which uses registration marks to guide blades and creasing tools. This method eliminates the need for a physical die and is ideal for fast turnaround jobs.

In Summary
Your printer is your partner in the process. Engage them early and talk through what you are designing and how best to achieve the desired result. Their experience can help you avoid unnecessary costs and ensure a successful final product.
Always test your design with a mock-up to confirm it suits its intended purpose.
And if you’d like help or want to discuss your current or next project, feel free to contact Remata Communications and Printers on 011 848 0000.