How to ensure your Design File really works for Print
Printing your files may seem like a simple task, but there are a few important steps which you need to take note of to ensure a smooth and successful outcome. It may seem a total waste to check but if you don’t check this all you could have serious consequences down the line and dreaded delays. Let’s make sure your printed materials turn out just the way you envision them!
Key points to check before sending:
Double-check that your file and job specifications match the quote you have signed off
A critical point that many miss as it seems so simple and yet often the size or page count is different. So, check your file’s page count and page size, eg: A5 or A4, is the same as your quote. Then check all specifications are what you require in terms of colour, binding and quantity. (Remember that in counting the number of the inside page: a leaf consists of a page on each of the sheet and a page is one side of the sheet)
Choose the right File Format when saving the document
When preparing a file for printing, the choice of the file format is critical. The file format determines the compatibility and quality of your final printed product. The accepted file format for printing is PDF (Portable Document Format), sometimes referred to as a PDF 1-XA file. This format ensures that your design elements, fonts, and images are preserved and properly displayed. Select the highest quality settings available to ensure optimal print results.
Embed fonts in the file
To ensure that the fonts you used in your design are properly displayed when printing, it is very important to embed the fonts into the file. This ensures that the printer has access to the required fonts, even if they are not installed on their system.
Avoid using wonderful looking but uncommon fonts
Using uncommon or unfamiliar fonts can create issues during printing. If the printer does not have access to the specific font you used, it may be automatically substituted with a default font, resulting in a different look for your printed material. To avoid this, stick to widely available fonts (there are thousands) or consider converting your text to outlines.
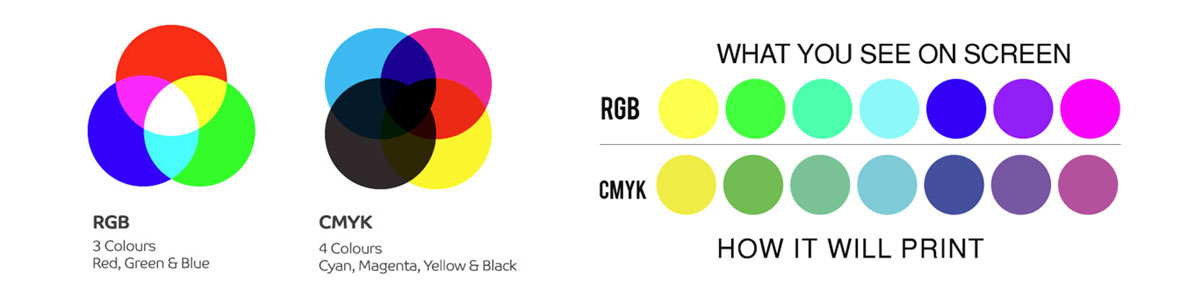
What’s your Color Mode
Colour mode refers to the color system used. The two main color modes are either RGB and CMYK. Important to note that your screen is RGB which makes colour look brighter and crisper, (think of how beautiful and clear the colour on your Smart Tv is!), while CMYK is used for print. This relates to the 4 colour inks used in printing – Cyan, Magenta, Yellow and Black. When preparing your file for printing, please ensure your colour mode is converted to CMYK to ensure accurate color representation. Failure to do so may result in color variations between what you see on your screen and the final printed product. Take a look at the visuals below.
What has DPI got to do with resolution?
The resolution refers to the number of pixels or dots per inch (DPI) of the images which is a critical factor in print quality. Higher resolution images result in sharper and more detailed prints. To determine the required resolution for print, consider the size at which the image will be displayed and the viewing distance. A resolution of 300 DPI is standard for high-quality prints. If your images have a lower resolution, they will most likely appear pixelated or even blurry when printed. Have a look at the examples below:
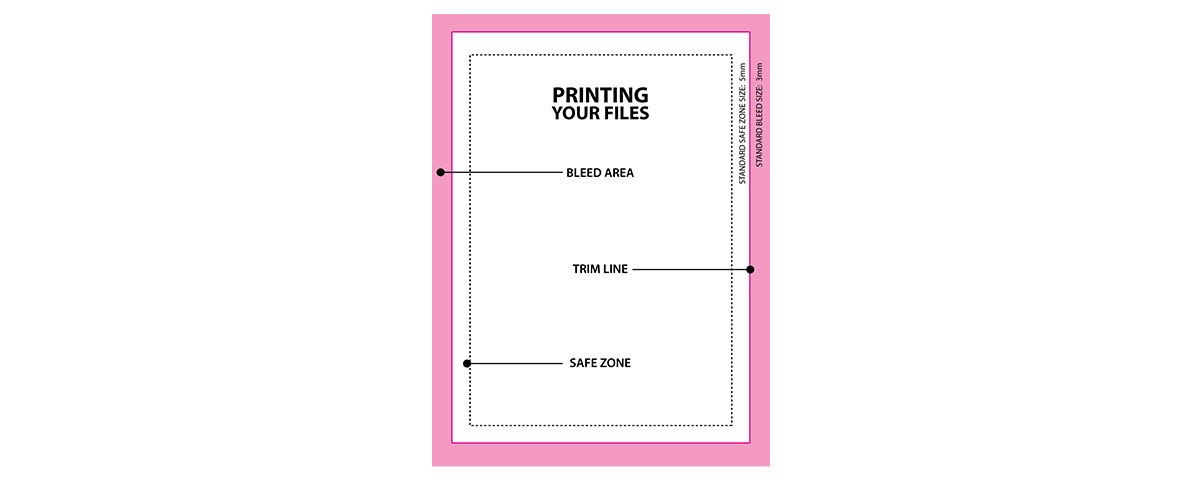
What’s all the fuss about bleed and safe margins in pages?
Bleed and Safe Margins are important considerations when preparing a file for printing as they take into account the tolerances required in print to provide you the best finishing result. Bleed refers to elements such as background colors or images that extend beyond the trim size. This ‘extra area’ ensures that any slight shift during the trimming process do not result in white borders around your extended designs. Bleed is normally set at 3mm. Safe Margins, on the other hand, are the safe areas within the trim size where your text and important design elements should be placed to avoid being cut off during trimming and provide a balanced good looking page design. A minimum of 5 to 6mm from the edges are a good point to start with. Remember that various binding types like wire or perfect binding, requires a lot more space than 6mm in the binding area so check this with your printer. Normally a space of around 16mm on the binding edge will suffice for items bound like this:
Check spelling and grammar
This may sound totally stupid but making changes after the proof is done will cost you dearly as the files or page changes need to be brought back into the printer’s workflow system again and positioned for the press it will print on. This could also mean your deadline will be pushed out to redo the first process yet again. So, before sending your file for printing, it thoroughly proofread for any spelling or grammar errors. Misspelled words or incorrect grammar will significantly affect the professionalism and credibility of your printed material. Take the time, check and make any necessary corrections.
Review your design and page layout for balance and look
In addition to checking for errors, it is important to review again the overall layout. Ensure that all elements are properly aligned, images are placed correctly, and the overall composition is visually appealing. You don’t want a final product that glare with balance and aesthetic issues.
Avoid scaling or resizing you pics
It is so important to start with the correct page size to ensure optimal print quality. Scaling up a low-resolution file can result in pixelation and loss of quality, while scaling down a high-resolution file may not achieve the desired sharpness.
File size need to be optimized
Large file sizes can be cumbersome and time-consuming to upload and process for printing. It is essential to optimize the file size without compromising the quality of your design. This can be done by compressing images, reducing unnecessary layers or elements, and selecting appropriate compression options during the export process. Remember, 300 dpi is good enough for good quality images. Higher than that will make the file size unnecessarily large.
File housekeeping
Proper file organisation makes it easier to locate and work on your files. Create a logical folder structure with clear and descriptive names. Keep all related files, such as images and fonts, within the specific folder. Regularly back up your files to prevent data loss. Don’t expect your printer to sort out a housekeeping mess that may well end up with wrong page in places or a huge delay in the deadline. Try using a naming system that includes relevant easy information such as client name, description, date, and even a version number. Avoid using special characters or spaces in your file names. Consistent naming conventions make it easier to locate and identify your files, especially when working on multiple jobs at one given time.
Provide necessary Instructions
Provide any necessary instructions to the print provider. This includes specific details on color preferences, finishes, special effects, or any even packing and delivery instructions. Clear communication and clearly documented instructions help ensure that your vision is accurately translated onto the final printed material. It’s always good practice to think of your printer being in a different country and you cannot speak to them personally. That will ensure you check everything a few times to ensure there are no comebacks.
Consult your print provider
When preparing a file for printing and you are unsure of anything, consult your print provider immediately. They will provide valuable guidance on their requirements, file specifications, and any necessary checks and balances to ensure a successful print job. You are now set up for print success.Contact us todayif you need any assistance and all the best with your next amazing print job!